4 Patients
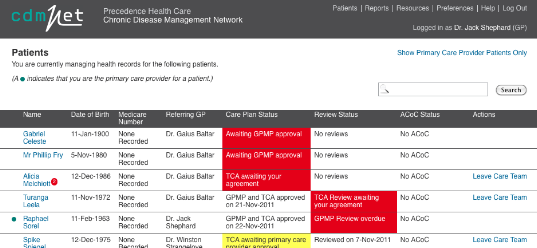
When you log in, cdmNet displays your patient list.
The patient list is sorted so that patient records needing
your attention (based on the information in the Status columns) are listed at
the top. The list then continues alphabetically.
If you have an extensive list of patients, you can change
the number of patients shown per page (up to 300).
If you cannot find the patient you are looking for
immediately on the list, you can search for them using the search box provided.
To search for patients, you can enter a first name, last
name or Medicare Number. For example, if the only information you had about a
patient was a surname, such as ‘Celeste’, you could type
‘Celeste’ in the search box and among the results returned you would
find the patient, Gabriel Celeste.
Click Search without entering anything in the search box to
display all listed patients.
A green dot to the left of a patient’s name indicates
that you are that patient’s PCP. Clicking Show Primary Care Provider
Patients Only displays the patients for whom you are the PCP. Depending on your
role, you may be able to change a patient’s PCP on the patient’s
health record if you wish (see
4.2.1.2
Changing a
Patient’s Primary Care Provider).
If you are logging in to cdmNet for the first time, you may
not have any patients. This may be because you have not uploaded any patient
information from cdmNet Desktop, or you may not yet have been assigned to any
patients by a PCP.
If you cannot find a patient’s name, this could mean
one of two things:
- If
you are a PCP or a CPC, you need to upload the patient's details from your
clinical desktop software using cdmNet Desktop. (Refer to the cdmNet Desktop
Guide for instructions.)
- Otherwise,
the patient's PCP has not added you as a member of the patient's care team.
Contact the PCP and ask them to assign you to a task on the patient's care
plan.
Clicking a patient’s name displays the patient’s
health record (see
4.2
Patient Health
Record). For Primary Care Providers and Care Plan Creators, if you
have not yet created a health record for this patient, clicking their name
displays the create health record page (see
4.1
Creating a
Patient’s Health Record).
4.1 Creating
a Patient’s Health Record
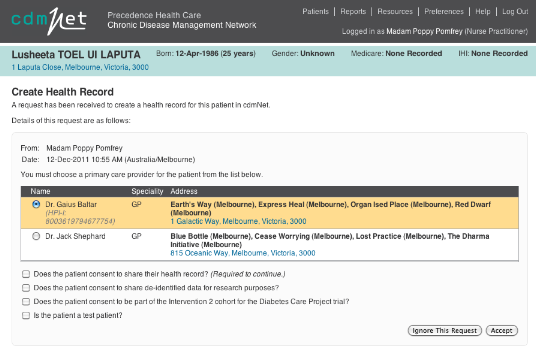
When you want to create a health record for a patient, you
can upload their medical history and clinical information from your clinical
desktop software (Best Practice or MD3) to cdmNet, using cdmNet Desktop (see the
cdmNet Desktop User Guide for more information). cdmNet displays the following
page.
Figure
6. Health Record Creation
If you are a Care Plan Creator uploading a patient record
onto cdmNet, you are prompted to select a Primary Care Provider. If the PCP you
select is participating in a cohort, an additional checkbox appears asking
whether the patient consents to being part of the Diabetes Care Project. If in
doubt, leave this box un-ticked; cdmNet Support can add the patient to the
cohort any time before the Care Plan is created.
You must obtain the patient’s consent to share their
health record in order to continue (unless they are a Test Patient).
Once you have created the patient’s health record, the
patient receives a notification from cdmNet with a username and temporary
password they can use to log in to cdmNet.
4.1.1 Test
Patients
If you tick the ‘Is the patient a test patient?’
box, the patient is marked as a Test Patient. This means that notifications will
not be sent to the care team linked to the patient.
Marking patients as test patients is recommended for testing
and experimental purposes for Primary Care Providers and Care Plan Creators,
particularly if you are new to cdmNet. Once you have marked a patient as a test
patient, you cannot turn them back into a normal patient. (However, you can
always delete that test patient and upload the patient record onto cdmNet again
if you created a test patient in error for a real patient.) You can turn off the
test patient option in your Preferences (see Chapter
7.1).
If you marked a patient as a Test Patient, cdmNet indicates
this on the patient’s health record with the following red bar, with the
option of deleting the patient.
Figure
7. Test Patient Marker
4.2 Patient
Health Record
When viewing the health record for a patient who does not
have a care plan, the main green navigation bar contains five sections to choose
from. They are:
- Contacts;
- Health
Summary;
- Measurements;
- Documents;
and
- Progress
Notes.
Figure
8. Patient Navigation Bar
When viewing the health record for a patient who does have a
care plan, there are two additional sections in the navigation bar. They
are:
Clicking a patient’s name in your
patient list to view their health record automatically opens the Contacts
section.
If a patient does not yet have a care plan, Primary Care
Providers and Care Plan Creators can click Create Care Plan to initiate one (see
Chapter
9 Creating
Care Plans). This link is available on all pages.
4.2.1 Contacts Page
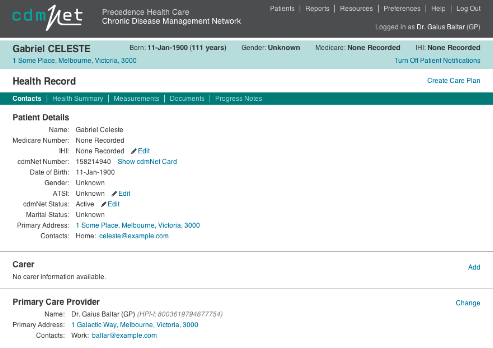
Figure
9. New Patient Health Record – Contacts Page
On the Contacts page Primary Care Provider and Care Plan
Creators (only) can:
- Turn
On/Off Patient Notifications (this is available on all sections);
- Edit
the IHI of the patient;
- View
the patient’s cdmNet Number and Card (see Chapter
4.2.1.1);
- Edit
ATSI status: (Aboriginal or Torres Strait Islander);
- Edit
the patient’s cdmNet status (Active, Discontinued or Deceased);
- Add,
Edit or Remove a patient’s Carer details; and
- Change
the patient’s Primary Care Provider (see Chapter
4.2.1.2).
When viewing the health record for a patient who has a care
plan, this page also lists the Care Team Details.
4.2.1.1 A Patient’s
cdmNet Number and Card
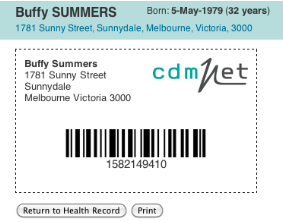
The ‘cdmNet Number’ is a unique number
identifying the patient’s record within cdmNet. Click View cdmNet Card to
display a printable card containing this number and a barcode, for use in
conjunction with third-party systems that integrate with cdmNet.
Figure
10. A Patient’s cdmNet Number and Card
4.2.1.2 Changing a
Patient’s Primary Care Provider
To change a patient’s Primary Care Provider, click
Change Primary Care Provider. cdmNet displays the following page.
Figure
11. Change a Patient’s Primary Care Provider Page
Select the Primary Care Provider you wish to assign by
clicking the page numbers at the top of the list if necessary until you find
them.
4.2.2 Health Summary
Page
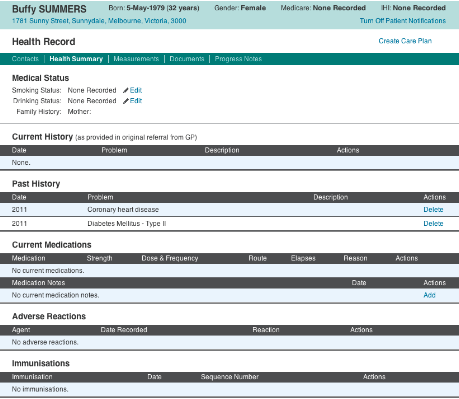
A patient’s health summary page contains the
information uploaded from the Primary Care Provider’s or Care Plan
Creator’s clinical desktop software (Best Practice or MD3).
Figure
12. Patient Health Summary Page
On a patient’s Health Summary Page, Primary Care
Providers and Care Plan Creators (only) can:
- Edit
a patient’s Smoking Status (Smoker, Ex-smoker or Non-smoker);
- Edit
a patient’s Drinking Status (Drinker or Non-drinker);
- Delete
items from a patient’s Current History;
- Delete
items from a patient’s Past History;
- Delete
items from a patient’s Current Medications;
- Edit
Medication
Notes
about a patient’s Current Medications;
- Delete
items from a patient’s Adverse Reactions; and
- Delete
items from a patient’s Immunisations.
Any items that you may wish to add or edit about a
patient’s Current or Past History, Current Medications, Adverse Reactions
and Immunisations records must be done and uploaded via the Primary Care
Provider’s or Care Plan Creator’s clinical desktop software (Best
Practice or MD3).
4.2.3 Measurements
Page
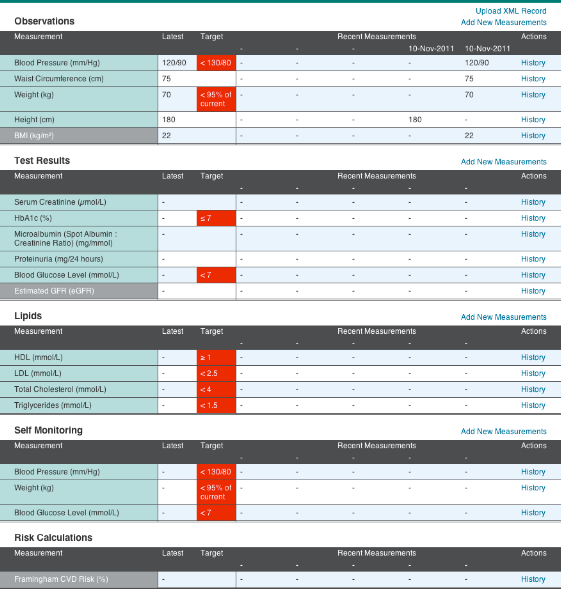
A patient’s measurements page contains information
about the patient’s clinical measurement history and how it relates to
their care plan.
There are five main categories of measurements. They
are:
- Observations;
- Test
Results;
- Lipids;
- Self
Monitoring; and
- Risk
Calculations.
Figure
13. Measurements Summary Page
Targets only appear on this page if the patient has a care
plan. The main point of the measurements page is to keep track of the history of
measurements and review how well the patient is progressing to achieve the
targets.
On this page, all providers can:
- Add
New Measurements to each category (see Chapter
4.2.3.1);
and
- Click
History in the Actions column to add a new measurement to a particular
measurement type (see Chapter 4.2.3.2).
If the PCP or CPC had any of the relevant data for a
particular measurement type on their clinical desktop software (Best Practice or
MD3), you should find it that it has been uploaded into the appropriate fields
in the Measurements Page.
If you are a Primary
Care Provider or a Care Plan Creator, you can also add data to the Measurements
page by clicking Upload XML Record and selecting the appropriate XML file if you
do not wish to add it manually.
The Self Monitoring category is primarily for patients who
wish to enter measurements they took themselves (for example, readings from a
home blood sugar level monitor). However, as a provider, you can also enter
measurements on their behalf if they are not confident or comfortable with doing
it themselves. You can see who entered particular measurements by hovering your
mouse pointer over a measurement value to display such information in a
‘tooltip’.
Figure
14. A Tooltip Displaying Measurement Value Information
4.2.3.1 Adding New
Measurements
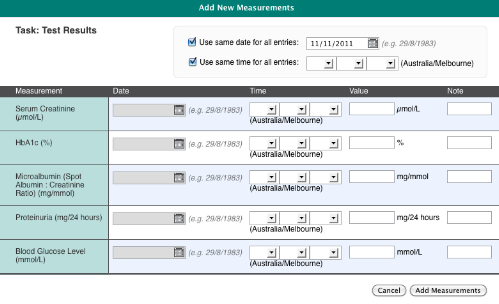
To add new measurements to a category, click the Add New
Measurements link to the right of the category. cdmNet displays a screen like
the following, where you can add the appropriate information accordingly.
Figure
15. An Example of an Adding New Measurements to Categories Page
4.2.3.2 History
The History screen contains more history of measurement
values than is displayed on the main Measurements Page.
Clicking History in the Actions column of a measurement
category also allows you to enter measurement values of the particular
measurement type you selected.
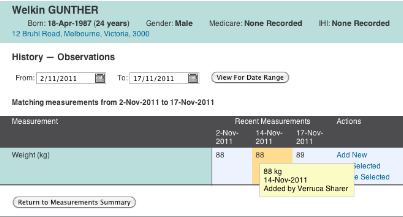
Figure
16. Add New History Measurement
In the above example of weight history, you can see three
historical measurements for the Date Range selected. Click a measurement to
select it. The middle measurement is selected and highlighted in yellow with the
tooltip displaying more information about the measurement value. Select a
particular historical measurement on this page, then click a link in the Actions
column to edit or delete it if you wish.
To add a new measurement value on the same page, click Add
New under the Actions column. cdmNet then displays the following page.
Figure
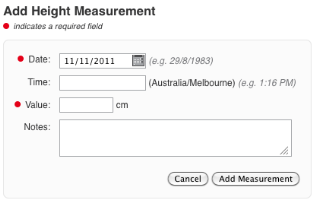
17. Add Measurement Value
You can add the appropriate Value and any Notes in the boxes
provided. Any notes you enter in this page will only be displayed in the tooltip
on the Measurements page when you hover your mouse over that particular
measurement value; they will not appear on the patient’s Progress Notes
page.
4.2.4 Planning
Page
The Planning page only appears in a patient’s
navigation bar if a care plan has been created (see Chapter
9 Creating
Care Plans).
The purpose of the Planning page is to set tasks and goals,
tailoring them to suit the individual patient in order for them to manage their
condition(s).
The content and composition of a patient’s planning
page varies depending on the condition(s) they have and your association with
that patient.
There is a general template of planning, consisting of five
main categories. They are:
- General;
- Lifestyle;
- Biomedical;
- Complications;
and
- Medications.
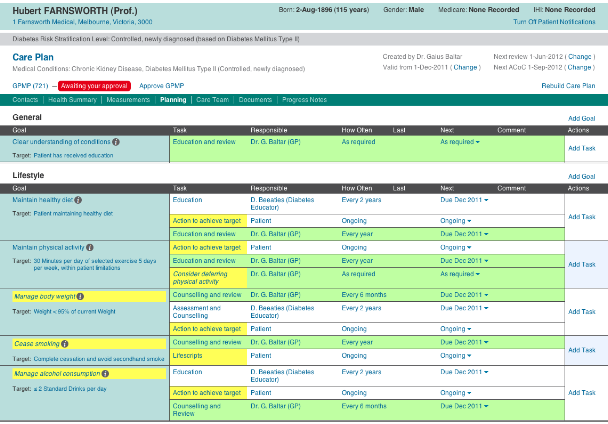
Figure
18. Planning Page – General Category
On this page, you can:
- Edit
the Last time a task was undertaken; and
- Set
the Next time a task will be undertaken.
In addition, PCPs and CPCs can:
- Add
new Goals;
- Add
new Tasks;
- Edit
or set the Responsible party for particular tasks;
- Edit
or set the frequency of tasks;
- Add
Comments about particular
tasks.
(For more information on the context in which you might do
these things, see Chapter
9.2
Modifying Care Plans)
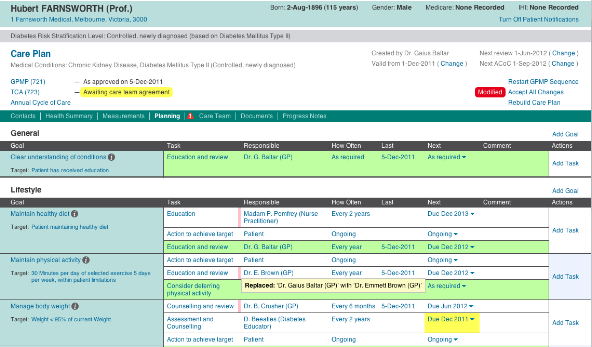
Care Plans consist of goals (column on the left) and tasks
to achieve them (Task column next to Goal column). There are providers
responsible for seeing tasks through (Responsible column) and the frequency of
the tasks to be undertaken.
|
Tasks
|
Indicates
|
|
Green
|
The task is your responsibility.
|
|
Yellow
|
Your attention may be required for this task, or you may
need to check the information cdmNet has generated.
|
|
Red
|
There is a problem that needs resolution (for example, an
overdue task).
|
|
Not highlighted
|
The task may be the patient’s responsibility.
Or,
The task has already been assigned to another provider.
|
Note that only Primary Care Providers and Care Plan Creators
can assign providers to tasks. Care Team Members cannot assign themselves to
tasks, regardless of their speciality and association with a patient.
4.2.4.1 Adding Goals and
Tasks
This functionality is only available to PCPs and CPCs.
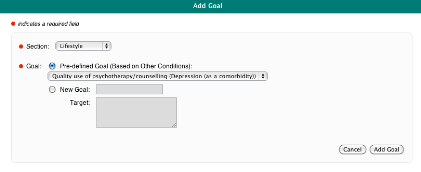
To add a new goal, click Add Goal to the right of the
category title to which the goal applies.
Figure
19. Adding a New Goal
Adding a pre-defined goal also adds the corresponding set of
pre-defined tasks associated with it.
You can add a custom goal if you cannot find an appropriate
goal in the pre-defined goal list. To do this, click the New Goal radio button
and fill in the appropriate details in the boxes provided.
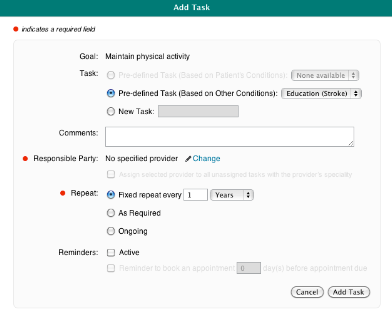
You can add tasks to particular goals where you see fit by
clicking Add Task in the actions column.
Figure
20. Adding a New Task
Just as you can add custom goals, you can add custom tasks
by clicking the New Task radio button and filling in the appropriate details in
the boxes provided.
You can edit tasks by clicking the task name under the Task
column and edit the task accordingly.
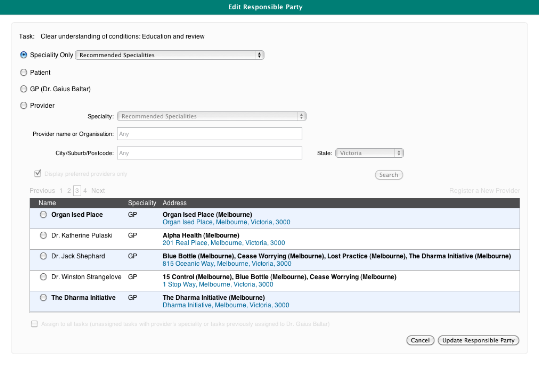
Tasks require responsible parties assigned to them. To
select a responsible party for a task you are creating, click Change. If you
wish to amend a responsible party for an existing task, click the responsible
party name. cdmNet displays the following Edit Responsible Party screen.
Figure
21. Editing the Responsible Party for Tasks
You can assign a single speciality to a task without needing
to select a specific provider. To do this, select the Speciality Only radio
button and find your selected speciality in the drop down list. When you choose
a single speciality, you can also record appointments and generate Allied Health
Referral forms for that speciality (see
4.2.6
Documents
Page)
.Ticking the ‘Display preferred providers only’
box restricts the search results to display the PCP’s preferred providers
only.
From here, you can also register a new provider on their
behalf if you cannot find them in cdmNet. To do this, click Register a New
Provider and fill in the appropriate details in the boxes provided (see
Figure 38).
As long as you are able to provide accurate contact information, the new
provider should receive a notification with a username and temporary password
with which they can use to log into cdmNet in future.
When you have selected the provider for a task, you can
assign them to all tasks that the previous provider was assigned to, or assign
them to unassigned tasks with that provider’s speciality. You can do this
by ticking the ‘Assign to all tasks’ box when it becomes available
after you select a provider.
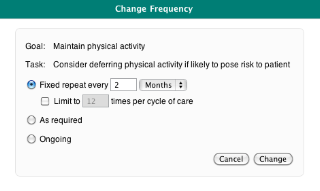
Tasks also require a set frequency. You can set the
frequency when you add tasks and then alter them by clicking their frequency in
the How Often column. You can also set a fixed frequency (days, weeks, months
and years) and limit the repetitions by ticking the tick box. cdmNet calculates
the number of times the repetitions occur when you set the fixed frequency and
tick the box.
Figure
22. Edit Frequency of Task
4.2.4.2 Creating and
Editing Appointments
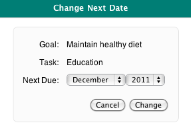
You can change the next date without setting a specific
appointment for when a task needs to be undertaken. Under the Next column, click
the downward triangle next to the due date, the options of changing the next
date and adding appointments (or adding measurements if clicking in the
Biomedical category) are displayed.
Figure 23. Change
Next Date Menu
You can change the next date for a task up to five years in
the future. When there is no specific party assigned to a task, you can only
change the next date.
Figure 24. Change
Next Date
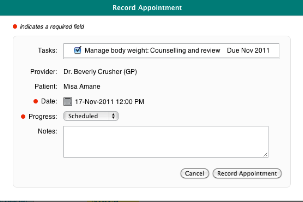
Figure
25. Record Appointment
Clicking the calendar icon next to Date displays a date and
time calendar where you can set a specific date and time for appointments.
4.2.4.3 Seeing Changes
After a GPMP has been approved, if any changes have been
made to the care plan (for example, assigning a different provider to a task or
changing a task’s frequency), a pink change bar appears next to the
modified area. Hover the mouse over the pink change bar to view information on a
tooltip as to what the change was.
Figure
26. Responsible Party Modified
Any modifications made to a care plan will also be indicated
by a red Modified mark on the top right of the page. The PCP or CPC can accept
the modifications by clicking Accept All Changes at their discretion.
4.2.5 Care
Team Page
The Care Team page only appears in a patient’s
navigation bar if a care plan has been created (see Chapter
9 Creating
Care Plans).
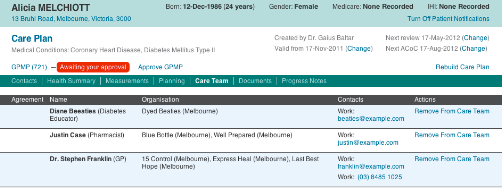
This page contains the list of the Care Team members
(individual providers and organisations) that are involved in a particular
patient’s care plan.
Figure
27. Care Team Page
On this page, you can:
- Click
a care team member’s email address to send them an email;
- Click
a care team member’s contact number to initiate a Skype call (if Skype is
installed); and
- Remove
a care team member from the care team.
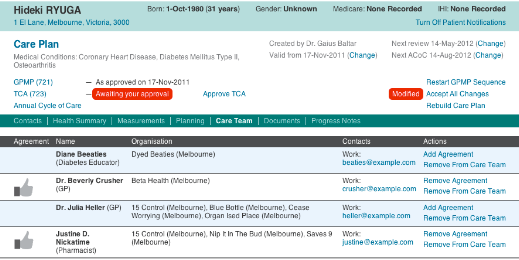
When a TCA has been distributed (see
9.4
Care Team TCA
Agreements), the Care Team Members need to agree to participate.
If/when they have, a grey thumbs-up icon appears next to their name.
As a PCP or CPC, you can add agreements from Care Team
Members on their behalf, provided that you have consulted with them on the
matter. To do this, click Add Agreement, and tick the box that confirms
it.
Figure
28. Care Team Page with Care Team Approvals
(Similarly, when a TCA Review is in progress, the Care Team
members need to agree to it and as the PCP or CPC, you can add agreements on
behalf of Care Team members. TCA Review agreements appear as a thumbs-up with a
green tick above it.)
4.2.6 Documents
Page
The Documents page has the following sections:
- Drafts;
- Current
Care Plan;
- Approved
Care Plans;
- Annual
Cycles of Care;
- Supporting
Documents; and
- Uploaded
Documents.
Depending on the status of the patient’s record, not
all of these sections are shown all the time.
If the patient does not have a care plan, only the Uploaded
Documents section appears.
If you wish to upload a document that you feel is relevant
to a patient, clicking Upload Document allows you to select a document to upload
onto a patient’s health record. (Note that all other providers associated
with a patient can also view any document you upload.)
Figure
29. Documents Page of a Patient with no Care Plan
Clicking the file name in the File column opens a new window
displaying the content of the document. You can also click View in the Actions
column to view the document in a new window.
Clicking the description of the file in the Description
column allows you to change the description of any document you uploaded.
You can download a document by clicking Download in the
Actions column.
You can also delete any documents that you have uploaded by
clicking Delete in the Actions column.
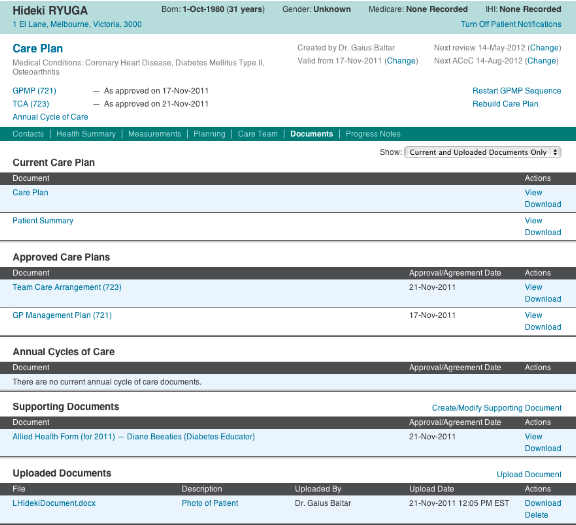
Figure
30. Patient With Care Plan Documents Page
If the patient has a care plan, the Current Care Plan
section shows the Care Plan and Patient Summary.
The Approved Care Plans section displays all approved GP
Management Plans, Team Care Arrangements, GPMP Reviews and TCA Reviews (Medicare
items 721, 723 and 732).
When a document has not yet been approved (such as GPMP or
TCA) a Drafts section is displayed, containing the related documents.
The Annual Cycles of Care section displays any approved
annual cycle of care documents.
The Supporting Documents section contains documents that
accompany the care plan, including Allied Health Forms, Dental Referrals and
Home Medicines Review Referral Form (900).
(In order to create a Home Medicines Review Referral the
patient’s care plan must include the domiciliary medication management
review task in the Correct Use of Medications goal (in the Medications category
of the Planning page). For more information about adding goals and tasks to the
care plan see Chapter
4.2.4.1
Adding Goals and Tasks.)
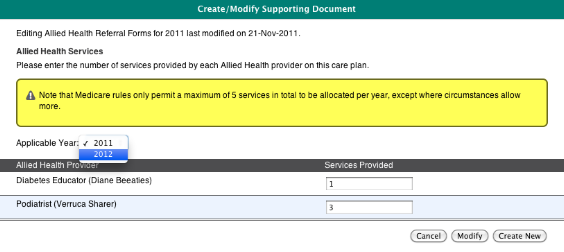
These documents will only be available when the TCA has been
approved. When supporting documents are already available for the current year,
Primary Care Providers and Care Plan Creators can create new or modify existing
supporting documents (where available) to prepare for the following year and
future needs of the patient by clicking Create/Modify Supporting Document.
Figure
31. Create or Modify Supporting Documents
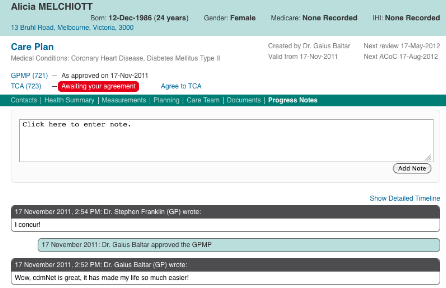
4.2.7 Progress
Notes Page
The Progress Notes page is where everyone involved in the
patient’s care (including the patient themselves) can make notes about the
patient’s progress. The page also displays information about when major
milestones (such as GPMPs, TCAs and reviews) related to the patient’s care
plan occurred.
Note that you cannot edit or delete notes once they have
been added.
Figure
32. Progress Notes Page
Clicking Show Detailed Timeline displays the full list of
notes and notifications, including GPMP approvals, the details of TCA agreements
from care team members, and so on.
When someone adds new progress notes, the green navigation
bar indicates that new notes have been added.
Figure
33. Navigation Bar with Progress Notes Notification
You will also find a notification mark next to the name of
the patient on your patient list when new progress notes have been added.
Figure
34. Patient List With Notification of New Progress Notes


